SPACE HUT

For Burning Man this summer I made a novel dwelling, sort of a cross between a monkey hut and a hexayurt, in the sense that the design itself is very close to being a monkey hut (a hemicylindrical structure with a flexible skin stretched over a rigid frame) but the structure is fully enclosed and insulated, a complete shelter, rather than just a shade structure for a tent or something.  Basically it’s a Quonset hut made of reflective bubble wrap.

IMG_3047

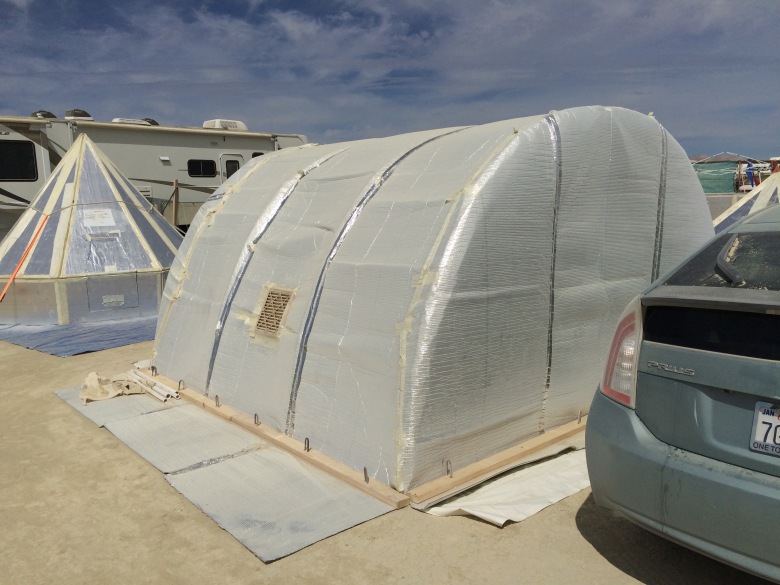
Here’s what it looked like right after I set it up.

I was pretty happy with how it turned out, and how well it survived repeated windstorms, and so I thought I would post here about how I made it.  This could probably be improved quite a bit, but I’ll try to stick to documenting what I did and leave speculation about what might work better as an exercise for the reader.

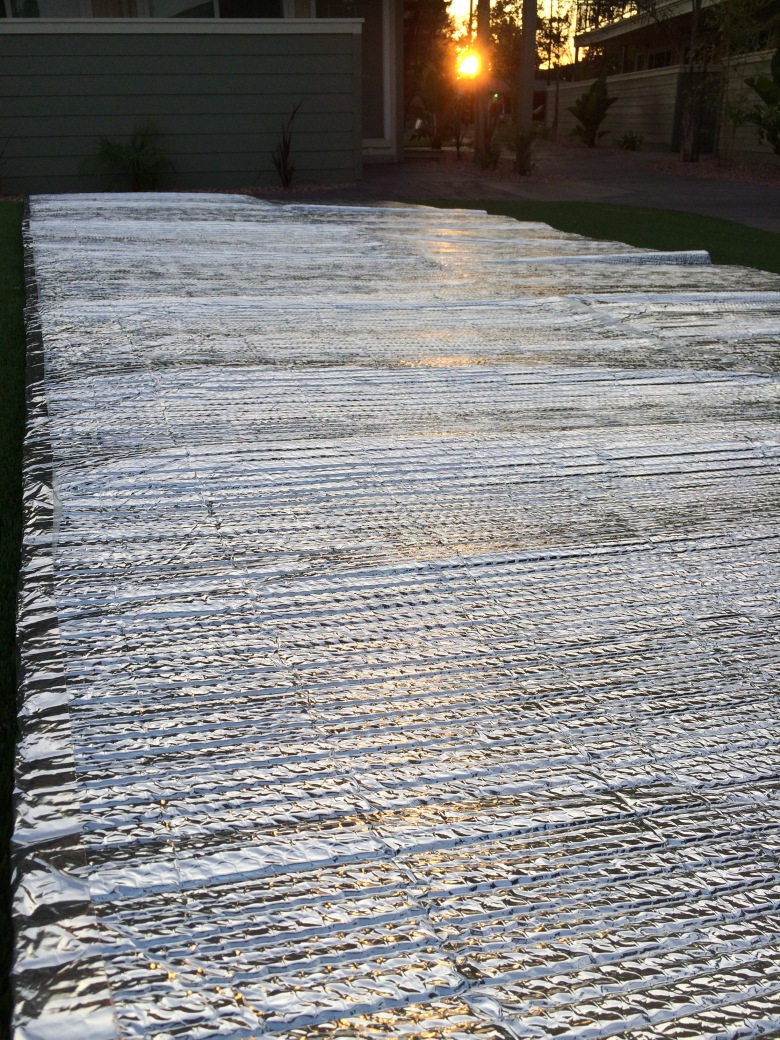
The floor of the structure was a white 12’x16′ tarp.  Now, an interesting (?) fact about tarps is that the advertised dimensions are almost always larger than the actual dimensions, because the “cut size” is smaller, after rolling up the edges to reinforce them or whatever it is they do, I don’t even know.  In this case, I wanted something that was actually 12’x12′ or more, so I got a 12’x16′ tarp that was advertised to be actually 12’x16′.  It still wasn’t quite as big as advertised, but close enough for my purposes.  Also I got a white tarp because I was tired of having a blue floor, and too lazy to put carpet, and also if you cover up the floor it insulates it from the ground, which actually isn’t so good because the ground maintains a more constant temperature than the air and therefore warms the structure at night and cools it during the day.  I mean actually I haven’t tried with a carpet, maybe it would be fine, mostly I’m lazy.  Oh, another big advantage of a white tarp is that it’s a lot easier to mark it up with a black sharpie.

IMG_3896

During disassembly, after taking down the wall with the door in it.

So!  Before heading out to the playa, I stretched out the tarp and put arrows along the long sides.  First, four arrows at the corners, a bit less than 12′ apart, centered so that there were roughly equal amounts of extra tarp sticking out on each side (but somewhat less than two feet because it wasn’t a full 16′ long, as mentioned previously).  Then between those arrows I put four more arrows, two on each side, at roughly 4′ intervals, for where the inner ribs would go.  I wanted the ribs to be almost 4′ apart, rather than the 5′ suggested in the standard monkey hut design, because the rolls of Reflectix bubble wrap I was using are 4′ wide.  I’m pretty sure the standard design uses 5′ mostly because you waste less pipe when cutting the pieces for the spine, since PVC pipe is sold in 10′ lengths.

I also put two big Xes on the tarp along the centerline, between the two corners, in the middle of each side wall, for an extra vertical support that the standard monkey hut lacks, because I wanted closed sides instead of open sides.

Monkey Hut.003

Floor tarp markings.


Next is the big roof piece.  I got a 100’x4′ roll of Reflectix from the Home Depot website, which came in a big box, and I cut three 25′ lengths.  In principle 20′ would be enough but I wanted some extra on each end, for reasons that will probably become clear once I get to the bit about the plywood.  The extra 5′ was probably more than I needed.

I taped the three 25’x4′ pieces together to make one big 25’x12′ piece, which could be folded accordion-style into a triple-thick 25’x4′ piece which I could then sort of awkwardly roll up into a big cylinder.  I taped the two seams with 3′ wide bidirectional filament strapping tape, the kind you use for hexayurts, which I think I bought from the U-LINE web site — it’s a bit hard to find.  It’s very strong tape and it sticks well to the Reflectix, much better than trying to tape two polyethylene tarps together.  I taped both sides of each seam, and I went over one side of each seam (the side that was going to be outside the structure, exposed to the sun) with some 3′ wide Reflectix aluminum foil tape, again the same kind of thing you’d use for a hexayurt.  This is supposed to help keep the tape from breaking down as quickly in the desert sun.  Not sure I would bother with the silver tape next time, but I did not regret taping both sides of each seam with the bifilament tape.

Monkey Hut.004

Bubble wrap for arched roof/walls.

I should note at this point that taping these big pieces of bubble wrap together was pretty awkward.  I needed a big space — the yard outside my apartment was where I ended up doing most of the work, since I don’t have a room indoors that big.  Mostly what I would do was to stack up the three panels, one on top of the other, and then tape two of them together along one long edge.  I found that it was better to use a bunch of short lengths of tape, no more than a few feet each, and overlap them slightly, rather than trying to use a single unbroken 25′ length of tape, which would inevitably end up getting tangled or applied unevenly and do a worse job.  I had to open and flip the panels around to tape both sides, and it was confusing, and at one point I think I taped the wrong pair of panels to each other, which is easy to do, and then if you want to do the aluminum foil tape it’s easy to get confused about which side is the same side as the one you already did.

IMG_2863

Taping the three strips of roof together, out in the yard.

Next were the side walls, for the end caps of the half-cylinder.  Unfortunately I didn’t quite have enough material left over from the first roll, so I had to get a second one.  I decided to make the two side walls different, because I wanted a door in one of them, and for some reason I decided it would be better to have the door in the middle of a panel instead of having a seam down the middle of the door, so I divided the walls into panels in two different ways.  One wall was made of three 8’x4′ strips taped together into a single 8’x12′ piece.  The other one was four panels — I made 3 8’x4′ panels like the first one, but cut one of the panels into two 8’x2′ pieces, and put one piece on each side, to make an 8’x12′ piece with one of the seams exactly in the middle.  I guess I could have just used two 12’x4′ pieces and taped the long sides together to make a 12’x8′ piece, but I wanted all of the seams on the structure to be vertical, because I thought it might be stronger that way, given how it’s all going to be held together.  But who knows.  I might try it the other way next time.  These double-taped seems seem pretty strong.

Monkey Hut.005

Bubble wrap for the two flat semicircular walls.  The door goes in the middle of one of the two big rectangles in the bottom piece.  Er, horizontally in the middle; vertically it’s a bit closer to the bottom.

Um but so anyway.  The side pieces are 12′ wide because that’s how wide the structure was going to be… actually the structure itself was a bit less than that, because I wanted a bit of overlap at the seams, and because the tarp was not quite 12′ wide, so 12′ wall pieces were perfect, really barely enough.  And 8′ because the overall structure is about 6′ tall, maybe a bit taller if it’s less than 12′ wide, but again I wanted some extra length to work with at the top and bottom to overlap things and to hold things down at the bottom, and in fact 8′ seemed like a pretty good height for those pieces.  I taped everything together with the 3′ wide bifilament tape on both sides and an extra layer of silver tape on the outside only, just like for the big roof piece, and folded and rolled them for transport.

IMG_2982

The two small wall pieces, loaded for transport.

All this taping took maybe 3 or 4 hours or more in total?  Not too bad, but not trivial.

Next was the wood!  I bought four 2x4s at Home Depot.  As with tarps, a 2×4 isn’t actually 2″x4″, it’s more like 1.5″x3″ or something, because the cut size is smaller… but it doesn’t matter, the point is the length.  The ones I got were 12′ lengths, which was perfect except that I can’t fit a 12′ long piece of wood in my car, so I had them cut each piece in half, into two 6′ lengths.  If I were doing this again I might try something even a bit smaller and easier to fit, like three 4′ lengths.

Anyway!  The point of these pieces of wood is that they are going to go all the way around the edges and act like giant staples, to hold the walls and roof down.  You drill holes in the wood ahead of time, put them right on top of the extra foot or three of Reflectix that is sticking out at the bottom, and hammer bent rebar into the holes, right through the bubble wrap and any protruding tarp, to hold everything down nice and tight.  I drilled holes at 2′ intervals, offset from the sides of each piece, so each 6′ piece had a hole at the 1′ mark, the 3′ mark, and the 5′ mark.

Monkey Hut.006

Wooden “staples.”  Notice how the corners work.  This lets the wood fit close to the frame even if the dimensions don’t match exactly.

I used a spade bit with a power drill to drill the holes.  I’d never used one of those bits before, and it took me a while to figure out how it works.  I wondered whether it would be best to drill a pilot hole first, with a normal bit, but after some experimentation I decided that, no, the pilot hole was not helping (and actually made things worse, if I made it too big), and it was easiest to just go straight at the undrilled wood with the spade bit.  I think the one I used was 5/8′ or something?  At least a little bit bigger than the rebar — you don’t want the rebar to be snug, you want it to be able to fit through the hole very easily, with a little extra space.  I got a bit of extra wood from a nearby construction site to put under the 2×4 as I was drilling it, then put my foot on the wood and drilled straight down, right into the scrap wood.  The holes were not super clean but they didn’t need to be.  This probably took an hour or three, much of which was spent experimenting, but things started to go much faster once I got the hang of it.

I had some pre-bent candy cane shaped rebar stakes that I’ve been using at Burning Man for the past several years, in a mix of 12″ and 18″ lengths, that I originally ordered from some online deer fence place that was selling them as fence stakes to keep deer or dogs or other animals from digging under the fence.  Nice clean tight 180 degree bend.  I understand that you can also bend the rebar yourself, using steel pipe or something.  The bent part just runs straight into the top of the wood and holds it down, rather than going over the edge of the wood and into the ground.  If it did stick over the edge, I’d want it to be an outside edge, so as not to make a hole in the structure that would let dust in.  Not that it’s going to be completely dust-tight regardless, but every little bit helps.

Monkey Hut.001

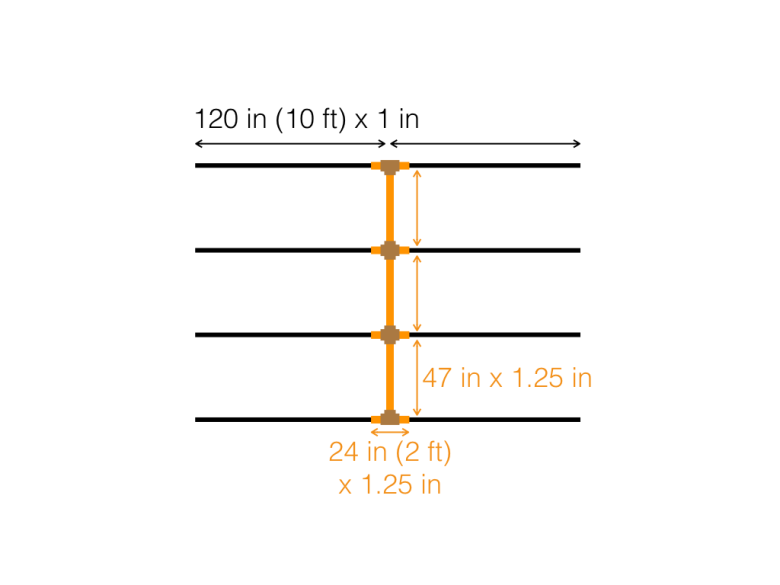
Assembled PVC pipe skeleton.  The curved pieces are the “ribs.”

The last big of major preparation is to buy PVC pipes, cut them, and tape them, as described on the monkey hut page with only a few differences.  I got 8 lengths of 10’x1″ schedule 40 pipe for ribs, 2 10’x1.25″ pieces for vertical legs (to be cut on-playa), two extra 10’x1″ pieces to slide inside the legs as reinforcement or to serve as spares if anything happened to any of the ribs (this was probably overkill, not sure I’d bother next time), and a few big and small pieces of 1.25″ pipe to make the spine and the rib connectors.  Be sure to get schedule 40, not the other kind, or the walls will be the wrong thickness and they won’t nest correctly!  There are three spine pieces to go between the four pairs of ribs, nominally about 4′ each but I made them more like 3’10” to account for the width of the connectors — you can measure how much length they add to the spine, it’s not a huge deal but I wanted to make sure that the 12′ wide roof piece would completely cover the spine so I figured I’d rather make the spine a little bit short than have it come out too long, and I did not regret doing this at all.  My rib connectors were 2′, not 2.5′, because I bought like three 10′ lengths which wasn’t quite enough to make all the spine pieces and all the rib connectors so I bought like one or two pre-cut 2′ pieces, since Home Depot sells them and I don’t like having too much extra pipe.  I could probably also have trimmed down the vertical legs a bit — they needed to be more than 6′ but certainly less than 8′.  Anyway.

IMG_3913

The 8 long PVC rib pipes, after I disassembled them and cut them in half to make it easier to load the car for the trip home.  Which you shouldn’t do, if you plan to reuse them!  I am a wasteful person.  Anyway.  Note the black tape near one end of each (full) pipe.

I put duct tape 1′ from one end of each of the ribs, to get them to slide the right distance in to the 2′ rib connectors, and I wrapped duct tape around both ends of the spine pieces to get them to fit just snugly into the connectors.  I also put duct tape around the middle of each rib connector, slid the appropriate connector onto it, and put a little piece of tape inside to keep the connector from sliding off in transit, while still allowing it to move around a bit to make assembly easier and let the structure shift with the wind and all that.

Monkey Hut.002

Flattened PVC pipe frame, excluding the two vertical supports.

Forgot to mention connectors!  There are only four.  Two were regular 4-way crosses, 1.5″ slip-fit, from Home Depot.  The other two, which would be 3-way tee connectors for a regular monkey hut (without vertical supports), had to be fancy 4-way connectors that go in three dimensions, which Home Depot doesn’t sell, because you would never need a connector like that in real plumbing — it would be easier to just buy two tee connectors and put them near each other.  But there’s a place online that sells “furniture grade” PVC pipe and connectors and has all sorts of exotic connectors with various weird angles that are good for building structures like this, so I picked up the two I needed from there.

What else?  Rebar!  I already mentioned the candy-cane pieces — one for each hole in the wood, so, uh, 24 of those I think?  Plus straight rebar for the ribs and the vertical legs.  I always use 2’x3/8″ because those are long enough that the pipe won’t slide off, but they don’t need to actually withstand being pulled out very hard, at least not in this design, so there’s no need to go with anything longer or thicker.  Ten of those: one for each rib, and one for each of the two vertical legs.

What else?  Furnace filters, to make windows!  I used two windows, on opposite sides of the structure, each of which was a 14″x14″x1″ filter bought at Home Depot.  I ended up bringing 6 total, so I’d have spares, but I only replaced the windward one once, I think.  But then I lent one or two to Mingjing for her yurt, so that was okay.

I also brought several rolls of magnet tape to make a door, like 15′ or more.  Honestly I think I would have been better off using a zipper instead.  Home Depot sells self-adhesive zippers that are meant to go in the middle of a tarp that I bet would work great, or else I bet there are lots of other places to get double-sided zippers that you could just sew on to the bubble wrap or something.  I pre-cut an octagonal door hole in one of the wall panels (3′ tall by 2′ wide rectangle with the corners cut off to make it a bit stronger), and used a scrap piece of bubble wrap to make an oversized octagonal door that was 2″ or 3″ larger than the hole all the way around.  I tried attaching the magnet tape to the bubble wrap ahead of time but this didn’t really work out for me and I had to re-do it all because it came off during the first windstorm, but I was able to get it to stick better the second time around by making little long tape loops out of 2″ wide bifilament tape, sticky side out, to stick the sticky side of the magnet tape to the bifilament and stick the bifilament to the bubble wrap around the hole; that worked much better.  On the door side I had the tape sticking out over the edge of the door with the magnet tape stuck to the sticky inside of the tape, making a little magnet flap.  You have to be careful to stick the magnet tape together first so it’ll be lined up, then tape everything down with the door closed so it’s all perfect.

IMG_3694

The door in its final form.  See if you can zoom in a little.

Oh yeah — I picked up a small roll of that whiteboard tape stuff and a couple of thin dry-erase markers and made a little message board, which actually got put to some good use.  Whiteboard tape started peeling off after only a day or two, so I taped the edges with foil tape, and that worked great.

Assembly works like this:

Unfold tarp, marked side up.  Put stuff on corners to prevent from blowing away. Pay attention to which way it’s oriented relative to the prevailing wind — I wanted the wind to blow into one of the arched sides, which I wanted to come down on the long sides of the tarp, not the short sides.  Hammer eight straight rebar stakes straight through the tarp, just inside the thick reinforced part along the edges, near the 8 arrows marking where the ribs go.  Each stake gets hammered in about halfway, so 1′ in the ground and 1′ sticking out.  Same thing for the two Xes where the two vertical legs will go, near the centerline of the tarp.  My tarp had a seam near there, so I put the hole just to one side of the thick part — it doesn’t need to be exactly right, the frame won’t be quite straight anyway, and you can cut the leg to the actual length, so it doesn’t matter.  Make the stakes as straight as you can manage but don’t sweat it too much.

Grab two ribs and one pre-assembled rib connector.  Insert taped end of each rib into connector, making a giant 20′ piece.  Remember that there are two kinds of rib connectors, one kind for the middle and one for the ends.  Slide one end of the 20′ piece into one of the straight rebar pieces, so it sticks straight up 20′ into the air.  Grab with your hands as high as you can and start pulling it down towards the corresponding stake on the opposite side of the tarp, so that the long thin pipes bend into a 180 degree arc as you slide the other end onto the other stake.  It should stay up there pretty good.  Repeat for other ribs until you have four parallel arcs.  Grab the three spine pieces and jam them in.  Use three 4′ bungee cords wrapped around the rib connectors to hold the spine pieces in their connectors — in this design the roof might hold it in on its own, but I used the bungees anyway, can’t hurt.

Frame-29-11-2015-17-25-03

Each end of each 4′ bungee loops around a rib and then hooks to itself.


The last piece of the skeleton is the vertical pieces.  Grab the overly-long 10’x1.25″ pipes, put one end right next to the rebar sticking out of the tarp, put the other end next to the connector, see how high it is, add an extra inch or two of length so it won’t pop out, and use one of those little racheting PVC cutters to cut the pipe cleanly.  (Avoid using a saw on the playa!  Sawdust is MOOP!)  Slide the cut end of the pipe over the rebar, then lift the whole frame a bit and slide the taped end into the connector.  Maybe wrap some tape around the joint or something so it doesn’t come lose before you get the roof on.  (Once you get the roof nailed down, this piece ain’t going nowhere.)

Now that the skeleton is complete, unroll and unfold the giant roof piece, get it flat, make sure the silver tape side is up, and drag it over the frame.  Do not underestimate how tricky it is to do this, especially if there’s any wind.  Get a friend or three to help, if you can.  I used blue painter’s tape to tape it roughly to the ribs so it wouldn’t move around too much.  Painter’s tape is nice because it’s easy to remove and reposition, but it isn’t strong at all, so watch out.

Unroll the two small wall pieces, get them as straight and as lined up as you can, and tape the vertical leg pipe to the middle of each piece.  This is definitely a two-person job — one on the inside with the tape, one on the outside to hold up the wall and press where the tape is going — so be sure to grab a campmate or a random passer-by.  I think I used 2″ bifilament for this right off the bat, but it might be better to start with painter’s tape and do bifilament once you’re sure it’s positioned right.

IMG_3362

This photo only shows one point where the vertical support is taped to the wall, but I did this in three or four places on each vertical support.  You don’t want to skimp on this, I promise.

Do the wood next.  Get each piece of wood as close as possible to the frame before hammering in the candy cane stakes.  For the roof piece, make sure its pulled as tight as possible.  For the side pieces just try to make sure that they’re mostly straight and centered; you can pull them tight when taping the top.  I skipped a few candy cane stakes, but I regretted it as soon as the first windstorm hit — the wall distorted noticeably, and after things had calmed down I wound up carefully yanking a foot or so of bubble wrap back under the wood with pliers and nailing down all the remaining holes.  Was glad I had so much extra bubble wrap sticking out at the bottom, and that I hadn’t trimmed off the excess.  With all the holes nailed down, though, I could have trimmed it if I’d wanted.

Get a stepstool or a camp chair or a box or something and go over the two outside seams, where the flat walls meet the arched roof.  Use scissors to cut the two small pieces into rough semicircles, so that there’s at least a foot of extra bubble wrap sticking up past the roof, so there is plenty of overlap.  Then use big pieces of bifilament tape going across the seam like sutures to secure it, then one or more long pieces of 3″ wide tape along the entire length of the seam to seal it up, then more crosswise pieces as needed to make sure everything is good and strong and isn’t going to come apart.  Be generous with the crosswise pieces — I needed to extend them a foot or more on each side of the seam to get them to hold well.  If there’s a loose bit of bubble wrap, don’t be afraid to just fold it over and put a big old piece of tape across it to hold it down and keep it tight.  If you are feeling ambitious, you can cover the seam with silver tape, but I will admit that I didn’t bother to do this, and it was pretty okay.  I had to add and/or replace a bit of bifilament tape midweek to keep things tight.

IMG_3892

Another photo taken during disassembly.  Confusing, I know.  Anyway you can see how the wall is now trimmed into something more like a semicircle.

I waited until the structure was completely assembled before cutting windows, since I wanted them to wind up at just the right height so that a box fan sitting on one of my storage bins would line up with the window, and it’s a lot easier to figure out where that is once the structure is completely assembled, because otherwise you’d waste a lot of time during assembly trying to line everything up perfectly when in fact it doesn’t need to matter when all the wall and roof pieces are longer than they strictly need to be.  Put a bin next to the center of a wall, hold up the filter where I want it to go, draw around it in sharpie, use scissors to cut three sides about an inch inside the lines.  Because I want the holes to be a bit smaller than the filters, so it’ll be airtight.  Fold the cut piece of wall back on the inside and tape it down — this way you can close it from the inside if you need to, like during a bad storm that rips the filter off.  I didn’t need to, even in the worst of it, but it’s nice to have the option.  Be sure to tape the filter to the outside of the structure, not the inside — you’ll get a lot less dust inside when changing the filters mid-week, plus it just fits better with the flap on the inside.  I initially taped the filters down with 3″ wide hexayurt tape, but ended up retaping with 6″ wide tape, since I had some and it turns out it’s really hard to tape them down well without leaving holes or having things come undone when the wind tries to blow through.

IMG_3783

Here’s what it looked like after it had been up for a week and a half, the day before I took it down.  That window is on the windward side.  See those big horizontal wrinkles?  Those will let a ton of dust in under the tape unless you really tape the hell out of it.

Last part is the door!  I wanted the door to be somewhat larger than the door-hole, so it would be easier to seal, so I left it off to make it easier to roll up the wall, and just lined it up and taped it on when I got there.  I was willing to have my door start a few inches above the level of the ground and the piece of wood and so on, so I didn’t need to line up the wall piece super exactly, but if you are feeling picky about this it might be easier to save cutting the door for the playa so you can put it exactly where you want it after everything is nice and tight, like I did for the windows.

Teardown is pretty straightforward — same steps in roughly reverse order.  Do try to keep things intact so you can reuse them, but if it comes to that it isn’t so hard to repair or replace any of this stuff.  The bent rebar hooks are easy to pry out using a hammer or crowbar as a lever to get them started, but be careful not to bend them when pulling them out, as this makes it much more difficult to deal with them next time.  For the straight pieces, I always use a pipe wrench to spin the rebar around in-place, then grab it with the wrench or with my well-gloved hands and yank it straight out.  (Don’t even think about ever touching rebar without gloves, it’s unbelievably sharp and oily and heavy and rusty and horrible.  Sorry, should have mentioned that earlier.)  If a few spins don’t loosen it up enough, try pouring a bit of water into the top of the hole and spinning it some more to work the water down and loosen things up.  Or you can get one of those fancy giant stake-pulling tools, but that almost seems like cheating, doesn’t it?  Which is to say that you should totally pick up one of those if you have the funds and the space for it, you’ll be really popular I guarantee.

Some things I enjoyed about this design:

It was warm at night, and cool in the morning, so I could sleep in!  Maybe not so cool during the hottest part of the day, but even that was totally bearable when I put the fan on.  (Brought the fan, battery, and RGB LED strip from last year, skipped the solar panel, had no trouble getting through 12 days or however long I was there.)  Temperature difference between inside and outside was comparable to last year’s hexayurt with its 1.5″ thick foam walls, which is to say that it varied between zero and maybe ten or fifteen degrees in either direction depending on the time of day.

IMG_3668

Indoors about 12 degrees F warmer than outdoors a few minutes after midnight on the morning of 2015-09-05.  This is soon after I got back, from ground heat, not my body heat.

Unlike the hexayurt, I was able to fit this thing inside my car rather than having to strap it to the roof.  I was able to load and unload it on my own, rather than having to have a huge production with lots of people and stepladders and dropping things and damaging the car and pulling over to re-tighten and wondering if it was going to fly off and kill somebody.  Even the big roof/wall piece is easy for me to grab and move around when it’s rolled up into a cylinder.  I was also able to do almost all of the assembly on my own, which again would have been just unthinkable with the hexayurt.  If it had come to that, I think I would have been able to fake my way through everything even if I’d been alone in the desert, assuming not too much wind anyway.  Honestly this isn’t so much of a big deal on-playa where there are always friendly people willing to help, but it can be a big deal before and after the event.

The floor area for this design is something on the order of 140 square feet, vs about 166 for an H12 or similar hexayurt.  The floor plan is much nicer, though — it’s a square, not a hexagon, so it’s easy to fit square things like mattresses and boxes.  And the walls are steep enough and the roof tall enough that I felt like I could stand up almost everywhere, despite being a bit on the tall side as humans go, as opposed to the yurt where I felt like I had to crouch down a bit almost everywhere.  It basically doesn’t get any better than this.  140 square feet is super luxurious for one person, which is how I like it.  It would be very easy to fit several people, and it’s easy to imagine lengthening the tube for even more space.

It’s super easy to do on-playa repairs and customization!  Tape sticks really well to the bubble wrap.  Tape sticks well to foil-laminated foam hexayurt panels too, but the foil rips right off and exposes crumbly fiberglass foam that makes a mess and is hard on your hands and is bad for the playa.  Which is also why you don’t want to ever cut foam panels on playa.  Cutting bubble wrap is super easy with regular scissors and makes no mess.  A related point is that it’s fricking impossible to reach the top of the roof cone of any but the tiniest hexayurt, even with a tall ladder, because it’s way out in the middle there, whereas with this design it’s very easy to reach just about any part of the structure that you might ever need to reach with nothing more than a small improvised stool or chair; in particular the outside seams that need taping on-playa are right there on the ends.

IMG_3866

I stuck one of those remote-controlled RGB LED strips to the inside of one of the ribs.

Both this design and the hexayurt look pretty cool and shiny and nifty and all that.  But nowdays you can’t spit at Burning Man without hitting a hexayurt.  Maybe someday this design will also be commonplace?  Anyway I got a lot of curious and appreciative comments.

Both designs seem quite sturdy.  I may have mentioned that there was a lot of wind this year — at least two major windstorms that destroyed a bunch of things; I’m going to be very conservative and guess that both had frequent gusts that exceeded 30 MPH, though the one dude with the anemometer claimed a fair bit more than that because of course he did.  I think the major risk to both types of structure might be from other large things blowing around and colliding with the structure — saw a couple hexayurts severely damaged in this way this year — which is another reason being able to make repairs easily is important to me.  (Those hexayurts were repaired, but only because we were a huge camp with multiple spare foam panels just lying around and enough people to have six people holding up each roof corner and more people on the inside and outside lining up and taping the new wall panels.  It was ridiculous.)

IMG_3066

An insufficiently secured shade structure in a neighboring camp blew into this poor innocent hexayurt.

We got a bit of rain last year, and my hexayurt was not waterproof, and I decided that it probably would have been almost impossible to waterproof it (too many little wrinkles where the water can seep under tape), and I think the same is likely true of this structure.   At this point, waterproofing is a non-goal for me — it’s easier to keep my stuff in bins and bags and sleep on a raised air mattress.  Like the hexayurt, this design seems likely to let water run down the walls rather than dripping annoyingly from the ceiling, but I guess I can’t say for sure.

I think the best thing for me, though, was that I got to try something new, and it worked out.  I had a lot of fun thinking about this and putting it together.  I went through so many different ideas.  It really kept me entertained!

We’ll see what happens next year….

I tumbld!

I may have accidentally started some kind of photoblog or whatever over at jf64.tumblr.com.

It is conceivable that I will start posting text over there too.

SVK Teardown

Last month I ordered a copy of SVK, a comic book printed in three colors, only two of which are visible to the naked eye. Unfortunately, the included “SVK object” arrived with a dead battery. Fortunately, BERG London are awesome. I barely had time to finish reading the book before the replacement arrived and I had the distinctly different pleasure of reading it again.

The SVK object is about the size of a credit card. There’s a thick part near the power switch and light source, then it tapers off smoothly towards the edges. I was able to peel off the opaque labels on the front and back, revealing the transparent body of the device, apparently made from a single piece of plastic. Front and back views of the untouched replacement and the original with labels removed:

I screwed up when taking the above pictures — each side’s interior is shown next to the opposite side’s label. On the logo side, you can see one lead from each ultraviolet LED attached directly to the negative terminal of the battery with some transparent tape. The power button side has a rectangular indentation in the transparent plastic, with the LED leads taped to a momentary switch. Here’s another picture with the tape and the switch removed:

The pushbutton switch is just a cleverly-shaped little piece of stainless steel. It domes up in the middle and has four points: three at the corners of the triangle, to hold the switch in place, and a fourth in the center to make contact with the positive battery terminal when you press down on the dome. Underneath the switch is a round white sticker with a hole cut in it. The sticker prevents the corner prongs of the switch from making electrical contact with the battery.

I thought I might be able to ease the battery out on the logo side without removing any more parts:

There are actually two batteries stacked in series. Ultraviolet LEDs probably need more forward voltage than a single 3 volt cell can muster. The battery on the switch side is stuck pretty firmly to the sticker. Looks like it will be necessary to disassemble this thing almost completely:

I removed the LEDs completely, even though I didn’t need to. If you ever find yourself in the above situation, note that the the shorter lead of each LED is the one that gets taped to the negative terminal of the battery, and the longer lead goes to the switch. Putting either the LEDs or the batteries in backwards will prevent the LEDs from lighting but shouldn’t cause permanent damage. Presumably, if both the LEDs and both batteries were backwards (with respect to the switch), everything ought to work fine….

The batteries are standard CR1220 3 volt lithium cells. My local drugstore apparently doesn’t carry that size, but Fry’s Electronics in Palo Alto sure does. (They’re also readily available online.)

If you’ve designed a circuit with a LED in it before, it probably included a resistor, to limit the current flowing through the LED. But these tiny coin cells simply aren’t able to deliver nearly enough current to fry the LEDs. The combined effective internal resistance of the coin cells is the only current-limiting resistor this circuit needs. Elegant.

The reassembled SVK object is no longer as pretty as its untouched replacement. I wasn’t very careful when removing or storing the labels, so they got curled and creased and didn’t quite want to stick back to the edges. But it works!

Cart Dream

I’m at work, a wooden cart on a narrow stone street atop a cold hill. It’s nearly dusk. The cart is tall and open on one side, revealing two huge computer monitors. The folks passing through the adjacent mosque door stoop to touch the calligraphic inscription on the sidewalk as they pass. God is great, it says.

Clark is asking if I could make a few simple changes to the user interface on the right-hand monitor, a stylized kitchen scene. Dan concurs. As he tosses me the mouse, the view shifts to the pink cheek of the woman in the foreground, every wrinkle and pore visible.

“I, uh… I don’t think I actually know how to use this program.”

A well-dressed angel investor I’ve never seen before interjects, “Five dollars says I can show you a better way.”

But this wasn’t my idea, I mumble. Dan’s purview. Unfair.

They’re all staring at me.

Five dollars?

“Fine,” I tell him.

He gestures down the road, where a smaller cart rounds the corner and climbs the hill. Two men pedal in front, singing Elvis, one strumming a ukelele as the other steers. The cart is open, like a pickup, piled high with crushed ice, dotted with buried drinks.

Nick giggles as they pass and calls out, “I’ll have a Republican.” The driver hands him a glass of ice, mixed nuts, and California white.

A cyclist follows, playing Nine Inch Nails on the guitar, steering his BMX by weight. The words and tune are wrong, but he doesn’t seem bothered.

“If you want to host a party, you need to hire both,” says the well-dressed man. We gasp. I feel around for a five-dollar bill.

“In fact,” he continues, “every single one of these characters is a leafy sea dragon.” It’s true — the woman in the foreground, her husband, the baby on the counter. Junior is greener and leafier; the parents look more like weedy sea dragons. We drained the kitchen in the last revision, courting a broader demographic. Now they float in air.

“Or a rabid wombat!” he finishes, indicating the monitor’s wooden frame. I can just make out carvings — squiggles, or spirals. Huh.

“And that,” he says as he turns to us, “is why we must always support Israel.”

He joins the musicians as they come running back and they yell and throw rocks at two men just exiting the mosque, chasing them down the hill and around the corner. We look on, slack-jawed.

Pressure

Driving home from work the other day, I saw this symbol light up on my dash for the first time:

TPMS icon

Turns out modern cars have radio transmitters hidden inside their tires so they can tell you when they’re underinflated. Who knew?

My old bike pump used to have a pressure gauge built-in, but it sort of fell out, letting the air escape with it. I plugged the hole with a pen cap, so it could still pump, but it couldn’t tell me when to stop pumping anymore, so I picked up an AccuTire electronic pressure gauge with a Permanent Lifetime Lithium Battery.

That was years ago. I no longer own a bike. My previous car was a 1999 and thus unable to complain, so its tires had to wait until I went in for an oil change, which I did pretty regularly I guess.

So yesterday I break out the gauge, for maybe the 2nd time ever, and my left rear tire reads “L”. According to the fine print, that means I’m supposed to mail the gauge (not the tire) to New Jersey at my own expense so they can replace the battery free of charge.

Instead, I take the gauge upstairs and try to open it. Turns out you can (a) unscrew the plastic nozzle and (b) peel back the rubber from the grip to reveal plastic tabs holding everything together. I eventually manage to push both tabs in at once and remove the handle. With nozzle and handle gone, the plastic casing falls into two halves and the innards pop right out.

There are 7 screws holding together a sandwich of plastic pieces on either side of the circuit board. Unfortunately, the battery is stuck in the middle.

With the screws off, one side of the sandwich slips right off. Not the side I want, of course. After a bit of prying, it emerges that the black piece that fits over the battery had been held in place by a bit of adhesive or sealant, right where the pressure sensor attaches. Whoops! I wonder if it’ll still be airtight when I put it back together.

Another surprise: the LCD isn’t attached to the circult board by anything more permanent than the pressure exerted by the plastic and the screws. I guess that helps explain why they went with gold plating for the PCB.

The battery itself is an ordinary-looking 3V lithium coin cell, CR-2032, the kind you find in everything. This one is firmly attached to one of the battery holder contacts by a little rectangle of black foam tape, which I scrape off with a small screwdriver. I dig through the battery drawer for a spare. No luck.

I’m distracted by this shiny printed circuit board. There is a tiny hole drilled through the PCB beneath the blue pressure sensor, presumably to prevent air from being trapped behind the sensor and giving a low reading.

And check this out: you actually see the bare die of the tiny chip labeled U2, through the soft transparent goop protecting it. Hair-thin bonding wires inside the goop connect it to the gold pads on the board. There’s a tiny black glob of goop under the chip, presumably just to stick it to the board. Usually these “glop top” chip coverings are black throughout, since semiconductors tend to respond to light as well as electricity. This one must be an exception, I suppose. Could be a signal amplifier for the pressure sensor.

The outer pads bracketing U2 are power and ground. You can see how they and the traces they connect to double as a shield to protect the analog signal on the inner traces from interference. Layout matters!

The main IC (U1) is entirely covered in the black stuff, as usual. Could be a general-purpose one-time-programmable microcontroller.

C3 is a thru-hole ceramic disc capacitor labeled 223, connected in parallel with the battery. 223 means 22 x 103 pF, or 0.022 uF. The giant orange cylinder sticking off the side a 22uF electrolytic capacitor, hooked up across the battery as well, with more of that clear glue to keep it from shorting. It’s called C4 on the PCB. Electrolytic capacitors used to be notorious for causing equipment failure when the electrolyte dried out after a few years, but the better ones are supposed to last longer nowadays.

C3, C4, and the battery (BAT-1) are each supplying power to the circuit, but on three different time scales. Cheap capacitors are often sufficient for this job. C3 takes care of high-frequency noise, C4 smooths out lower-frequency voltage fluctuations, and the battery keeps everything going for the long haul. Or not, as the case may be.

J1 and J2 are configuration jumpers. Each is a little glob of solder stuck to one of two pairs of pads on the PCB, like a switch that’s permanently set at the factory. Perhaps a different arrangement of solder would tell U1 to display a reading in kPa instead of PSI, for the non-US market.

The sensor side has gleaming gold test points TP1 through TP10. It’s a bit easier to do automated quality control if all of your test points are on the same side of the board. The MCU/LCD side has slightly smaller P1-5, perhaps used to program or calibrate U1 after the board is assembled.

R1 is a precision surface-mount resistor. I say “precision” because it has 4 digits printed on it, but I can’t quite read them, and my phone won’t focus that close. Should have done this in the workshop! C1 and C2 are unlabeled surface-mount ceramic capacitors, which are often of higher quality than the likes of C3 and C4. Their color indicates that they have relatively high capacitance for their size, perhaps as much as 0.1uF (as opposed to say 10pF, which would be light gray).

You can see a row of 13 gold contacts connecting the LCD (LCD-1) to U1. It looks like U1 drives the LCD directly, perhaps with a little help from R1, C1, and C2, but 13 isn’t enough to drive 24 or so segments independently (looks like 18.8.8 when it catches the light). It’s enough to drive one 8-segment digit at a time, though, including the decimal point or leading 1. Liquid crystals react slowly, so if the MCU switches quickly, the display won’t flicker.

It’s getting dark! I walk to the drugstore in the rain, buy a new battery, walk home, pop it in, and screw everything back together. The left rear tire now reads “01.0”. Huh! I don’t hear air escaping from that seal I broke, at least. The Internet’s suggested re-zeroing procedure has no obvious effect. Am I doing it wrong? I think I must have done it wrong. Hmm.

Jessica assures me that the gas station has a pressure gauge I can use, and even an air compressor. Sounds like a pretty sweet setup! Maybe I’ll swing by today and check it out….

Mayhem

Blake was with me in the car when the shooting happened. We had just dropped John off at his apartment, right above my old apartment, on Linda. On the way there I’d driven over a fire hose — there was a fire truck on 16th near Valencia, and flares blocking the oncoming lanes, so that cars on that side were crossing over into one of the two lanes on our side. Excitement! I remember remarking that I didn’t think I’d ever driven over a fire hose before. On the way back we’d driven past a couple of police cars near 19th St and Mission, strobing red and blue. There were a fair number of people out and about on Mission — I’d joked about not running the yellow light at 18th, because a woman had started crossing in front of us just before the signal changed.

Not long after that light turned green, we heard five or six shots in rapid sucession, pretty evenly spaced, maybe about a second or a second and a half from first to last. I guess it seemed like they were coming from ahead of us somewhere, though I’m not sure if we could really tell. I was driving up Mission towards 17th. I remember wondering what the sounds were even though I knew right away, because there wasn’t really anything else they could be.

Then I saw the guy, on the far side of 17th, on the right side of the road but standing a little bit out into the crosswalk. It was pretty quick, and I wasn’t paying proper attention, and the lighting wasn’t great, so I just had an impression of a man, facing us (but looking across, to his right, to the west side of Mission), right arm extended in that direction (I think?). Holding a gun? Or not. It was dark and we must have been half a block away. I don’t know what gave me the impression that he was a man, but maybe his clothing? He must have been wearing a jacket, or possibly a long-sleeved shirt or something, because that outer layer was hanging open, unzipped or unbuttoned, so that I could see the corner of it sort of silhouetted. And I had the impression of him turning towards the sidewalk and disappearing off to the east, towards 17th, though I suppose for all I know he could have turned onto Mission, or even ducked into a building or something. I mean, to me it was like he just disappeared, ran off east down 17th, out of my sight. It feels like I would have tracked him much longer if he’d turned down Mission, whether towards us or away from us, or had gotten into a car or bike or whatever on Mission, and I didn’t see anything like that.

I had the impression of someone a bit on the short side, or maybe of average height. Pretty short hair, or hair of unremarkable length, as opposed to very bald or extremely long. Might have been wearing a hat, I suppose; I don’t remember noticing. And I had the impression of someone more fair-skinned than dark-skinned — more white than black in appearance — though who knows if I could really tell, especially in that kind of light. I mean, I think I must have actually seen his face, for a split second, from a distance, though I don’t think there’s any chance I’d ever recognize him, or even have much of a sense of what he looked like. And I don’t think I actually saw him shooting; it felt like I saw him right after that, maybe still pointing the gun, you know? I mean, he could have fired all of those shots right from that spot, for all I know, right there in front of me in the street, but I didn’t pick him out until after the sound of the last shot. We were at least half a block away. It was night. I definitely saw him fleeing, though.

There was another car ahead of us, in the left lane I think, almost at the intersection, and there were plenty of people around, in other cars and on foot, on the sidewalk and in nearby businesses. It seems likely that somebody must have gotten a better look than I did. The light was green, but the car ahead of us was stopped exactly as if it were red, and there were other cars on 17th that actually were stopped at a red, and I was stopped several car lengths further back, in the right lane I think, and then after a long pause the car ahead of us continued through the intersection, but I pulled over up near the corner where there was space to do so and dialed 911, via the car’s Bluetooth speakerphone. There were a few people already crossing the streets to the opposite corner of the intersection, the northwest corner, but I didn’t see anyone obviously already calling 911 right at that moment, even though it seemed like surely everyone must be, so I called.

I heard sort of a long agonized cry, just once but pretty loud and long, coming from somewhere ahead of us I thought, presumably from someone who’d just been shot and was in a lot of pain. I guess it sounded more like a man than a woman. I thought I saw someone lying in the sidewalk off to the left, on 17th, a little ways from Mission. Two or even three people over in that area, but only one prone? Confused impressions. Light was not so good. I mean, there was plenty of light from streetlights, I suppose, but that’s not really so good, you know? And even in daylight, it’s hard to see things, and harder to understand what one is seeing.

We got a recording, and then an operator after a short time, long enough to hear several sentences of the recording, which was in several languages. Maybe 30 seconds or a minute at most, which I remember thinking seemed a lot quicker than the last time I’d called 911 from a cell phone in that neighborhood, some years before. They asked whether it was medical or what, and I replied that I’d just seen somebody get shot at the corner of 17th and Mission. The operator asked me about it again, and I repeated what I’d said, this time specifying the northwest corner of Mission and 17th. I didn’t say San Francisco, but it seemed like they knew. They said that there was somebody already at the scene, then corrected themselves. I think I might have mentioned the police cars we’d seen a couple of blocks back, which had been heading away from where we were now, or perhaps Blake did.

There was already a surprisingly large crowd gathering on the opposite corner, so that I couldn’t see anymore what was going on over there. I told this to the operator, who had asked whether we had any notion of the victim’s condition. Then an ambulance arrived, lights flashing, coming from the opposite way on Mission. We told that to the operator. Again, pretty good response time, I thought. They asked about the suspect: where they were, which way they’d been going, whether they’d been heading towards anything, whether I could describe the suspect, or the suspect’s clothing. I said that he’d been on the northeast corner and that I thought maybe he’d gone east, that it was dark and that I didn’t really see much. The operator asked for my name, and I gave it, without spelling it. They thanked me and that was that, and I hung up. I think I would have hung up then even if Blake hadn’t quickly prompted me to do so, presumably to free up the line.

I don’t think Blake said anything during the call, or not much, but I’m not sure; he may have mentioned something about the ambulance or prior lack thereof, for instance. I don’t think he saw even as much as I did, but I’m not sure I asked. It was a major topic of conversation on the way back to and across the Bay Bridge, of course, but didn’t go over what we remembered seeing or hearing in any detail.

You know, it’s funny — I don’t really remember whether the operator was a man or a woman. Presumably one can often tell these things, but I wasn’t paying attention to that, you know? I don’t remember. If I had to guess I’d guess a woman. Anyway it was a bit like that with the guy I saw. I’m terrible at remembering people or describing people in the best of times, and I really hardly got a look at this guy at all.

My phone claims I called 911 at 10:28, and that the call lasted 1 minute and 49 seconds. Sounds about right.

Earlier that evening, on the way to the restaurant, Blake and I had passed an accident on the Bay Bridge, pulled over in the left lane with lots of emergency vehicles and something like six cars in various states of destruction. Just another night, I guess….

Meme

(via milkysa)

1. What song or album are you currently addicted to?

None.

2. What game are you currently playing?

The Internet Meme game.

3. What was the last movie you saw?

Word Wars, a 2004 Scrabble documentary. Solid!

4. Asian or Mexican?

There is this Indian burrito truck called Curry Up Now. The food is pure genius. The people seem very nice. The overall experience is a bit frustrating.

5. My feet are cold. Are yours?

No.

6. What’s your current fandom/obsession/addiction?

Computational geometry.

7. Are you a cat person or a dog person?

Cat.

8. What’s the last thing you broke?

REDACTED. Don’t worry, it’s fixed now.

9. What was the last thing you bought?

Blueberry toaster waffles from Trader Joe’s. Not my favorite flavor, but there’s apparently been some sort of nationwide toaster waffle shortage in recent weeks, and these are the only ones to have reappeared thus far.

10. Do you have more friends online or off?

There have been times in my life when that question would have made a lot more sense than it does now.

11. Something that made you laugh today?

Waving at Jessica as I pulled the car out of the driveway this morning. It got so wavy in there!

12. Favorite non-alcoholic beverage?

Water.

13. What was the last meal you ate?

Chicken salad sandwich on organic baguette with inorganic yellow mustard, sliced industrial tomatoes, baby spinach leaves, and brie; and quinoa salad with tomatoes and red onion and red cabbage and lots of freshly squozen lime juice. Both delicious! I made the sandwich, and Jessica made the salad.

14. What kind of car do you drive?

2010 Toyota Prius. I keep wondering how hard it would be to reflash the navigation computer with some more tractable software. Am I really the only one who wonders that? Come on, Internet!

15. Any plans for today?

Blog.

16. Favorite TV show that you don’t normally tell people you watch? Favorite TV show that you think more people should watch?

30 Rock. Caprica.

17. What kind of music is contained in your hard drive?

The complete works of Adam Benjamin. Ha, I only wish that were true. I don’t even have his latest CD yet.

18. Are you attending conventions of any kind this year?

Not insofar as I am aware at this time.

19. Something you’re scared of?

Skeeter eaters! They’re called that because they’re supposed to eat mosquitoes, even though they don’t eat anything. They just flutter around terrifyingly.

20. Right or left handed?

Tag, you’re it! Yes, you! Right.

Long Live toastball!

My computer died again.

The computer in question is toastball. That’s the one that currently lives at the Shiny Devices workshop, over on Coliseum Way, and serves the web site, and runs the robots and so on. Why yes, the Shiny Devices web site is served by the very same computer that controls the machines that makes the devices that are available for sale on the Shiny Devices web site.

Or it was, at least. Those of you who have been paying attention will already have noticed that shinydevices.com is up right now, and has been up this whole time, with nary so much as a momentary glitch. That’s because this started out as scheduled downtime. My landlord (Rod) left a note in my mailbox [which is not illegal, by the way — these are different mailboxes from the one the USPS delivers to], from PG&E, about how they were going to be cutting the power sometime between 9 p.m. on Friday and 6 a.m. Saturday, for several entire blocks around Coliseum Way and High St, in order to “install new equipment.” So I switched the DNS over to OFB earlier in the week (I’ve been keeping automatic nightly backups there since forever), and shut everything down on Friday in an orderly way. But when I came back on Saturday, toastball refused to power on. Sad!

I’ve pretty much torn the machine apart now, and my guess is that it needs a new power supply. Either that or new RAM (yeah right) or a new CPU (seems unlikely) or a new motherboard (depressingly probable). But oftentimes, when a toastball dies, it seems to be the power supply.

I have a wild theory now, actually, about why that might be. I’ve been using an uninterruptible power supply — a battery backup power supply for my computer, basically — ever since we had those rolling blackouts back in 2000 or whenever that was. Possibly even before then. Anyway, I can’t help but wonder whether the UPS might be cranking power in the form of a nasty sharp square wave, rather than the nice rounded sine wave PG&E delivers. Could be it only does it when it’s running on battery power. But my theory is that the power supply is desperately trying to smooth out the high frequency nastiness and round off the corners of the squares, and that the resulting stress is reducing its life expectancy.

I’m kind of tempted to investigate this theory by hooking a scope up to the battery-backed outlet in the UPS and see what the waveform looks like. But that wouldn’t be very safe — I don’t have the right kind of equipment in the workshop for dealing with high voltages. It isn’t that the measuring devices won’t go that high; in fact the garden-variety multimeter I’ve been using will measure 600 volts or more, no problem. But you’re not supposed to just stick the little probes in the wall socket and measure the voltage that comes out, because that would be a dangerous and stupid thing to do.

You know, I have a funny story about that, actually.

Some of you will have heard this story before. This is the one about the beautiful apartment that Jessica and I are renting, with its expansive windows overlooking Lake Merritt and its gorgeous non-conductive hardwood floors.

At some point Jessica went down the Oakland public library to find out more about the building we lived in. (Thanks Jessica!) They ushered her into this special room where they keep all of these old maps and Thomas Guides and property records and original plans filed with the fire marshall — all this great stuff! And she discovered that our building was built around 1920, as a 2-unit dwelling, by an unmarried woman named Louise Graff, who was sufficiently well-to-do to build a building and own a car. Louise herself lived in one of the units. She must have kept on building, because by 1925, there were 3 units, and as I write this in 2010, there are 5. Our back bedroom is a few inches higher and has different floors and was clearly added on later. My point is that it’s a beautiful apartment, but it’s had time and opportunity to accumulate a few quirks.

Now, as a computer person who had lived in a couple of older apartment before, usually with a mixture of 2-prong outlets and 3-prong outlets, some of which were not actually hooked up to power, I was glad when I saw that this place had 3-prong outlets everywhere, and that the correct lights lit up on my little 3-light outlet tester when I tried them. Not that it would have influenced our decision much — we’d fallen in love with the view and the floors — but it’s always good to know about these things before moving in.

About a month after we moved in, I flew down to Burbank and drove back in a rented SUV with a brand new fully automated pick-and-place machine in the back, which I temporarily set up in the back bedroom (thanks Marc and Blake!), along with the toastball of that era (the Shuttle SN41G2), so as to reverse-engineer the serial protocol that the horrific Windows control software that came with it was using. [This was also perfectly legal, as I understand it, even though I don’t think our apartment is zoned for light manufacturing; Shiny Devices was not yet open for business, and I wasn’t manufacturing anything back there.]

Most people have never seen or heard of a pick-and-place machine. It’s a type of industrial robot that picks up unbelievably tiny surface-mounted electronic parts [think sand grains] with a tiny little robotic vacuum nozzle and places them on circuit boards that have been pre-smeared with solder paste, usually with a laser-cut stainless steel stencil. Then you run the boards through an oven (usually the kind with a conveyor belt, so you don’t have to open and close it) that melts the paste — a mixture of powdered tin, a bit of copper, a smidge of silver if you’re not too cheap, plus the nasty liquid chemical solvent equivalents of whatever it is that gives Velveeta that smooth creamy consistency in the microwave — and turns it into solid metal connections between the chips and the board, which you then shove into an injection-molded plastic case and wrap up in child-suffocation-warning-adorned plastic film and a glossy pre-printed cardstock box and ship off to Best Buy by the full truckload. That’s tradition, anyway. Shiny Devices is a little bit different.

In order to place the parts accurately, most pick-and-place machines have one or more video cameras connected to powerful computers that use clever machine-vision pattern-matching algorithms to place each part in exactly the correct position and orientation. Mine came with a fancy PCI card with six video inputs (this particular robot only has 4 cameras) and a 3.5″ disk (remember those?) with a license key on it for the terrible proprietary Windows-only device driver that knows how to talk to the PCI card. (I had already explained to the nice folks who made me the robot that I would be providing my own computer.) There was no way that card was going to fit inside toastball’s stylish but cramped Shuttle case, so I borrowed an old hulking Dell from my brother Marc (thanks Marc!) and installed the PCI card and the factory-provided Windows-based robot control software on it for long enough to make sure that everything worked, with toastball as man-in-the-middle monitoring communications between the software and the robot.

Remember how I said the robot has 4 cameras? Three of those are miniature black-and-white video cameras that put out a regular TV signal (NTSC). The fourth, amusingly, is an ordinary Sony digital camcorder, complete with the original glossy pre-printed cardstock box, that attaches to a standard camera mount on the robot frame. I even bought it a little Sony digital video cassette as a present, just so that it would quit whining about not having one. It has a regular TV out, which I’d connected to the 6-input PCI card, but (being a digital camcorder and all) it also has a digital output, which uses a connector that Sony calls iLink and IEEE calls IEEE 1394 and Apple calls FireWire, or DV when it’s being used for video. As it happened, toastball had a FireWire port already, and when I downloaded dvgrab and got the appropriate cable and plugged it in, everything worked great — so well, in fact, that I ended up purchasing an NTSC-to-DV converter box and a computer-controlled video switcher box to hook up the other three cameras. Which meant that toastball would only be able to see one NTSC camera at a time, but that was OK.

Now, a very interesting and unexpected thing happened the first time I connected the video cable between the video switcher (which was plugged in to the three cameras on the robot) and the video converter (which was connected to toastball’s FireWire port). There was a loud noise! And sparks! And smoke! And toastball’s screen went blank! Yikes!

Well of course I unplugged the cable as fast as I could, and when I’d recovered my composure a bit I assessed the damage. The video converter appeared to be dead. toastball refused to power up. The robot, video switcher, cameras, and everything else seemed to be just fine, thank goodness.

So I dialed the customer service number for the company that made the video converter, and I explained to them that I’d just bought their product, and I sort of outlined to them what had happened the first time I’d tried to used it. The fellow who took my call asked me a couple of basic questions, then explained what had undoubtedly happened. The video converter was indeed fried, as was my computer, but it wasn’t strictly the video converter’s fault. Possibly I had inserted the FireWire connector backwards. (It’s an idiot-proof connector — one side is rounded, the other side has square corners — but I can imagine someone managing to force it in backwards if they were sufficiently motivated.) More likely, my computer’s FireWire card (the motherboard, in this case) was shoddy in some way. The fellow went on to explain that their policy was to allow their customers to make this mistake exactly once, but that I should try to be more careful next time. I decided to bite my tongue. He was offering to replace the dead video converter, after all, which was what I wanted.

The new converter arrived soon after, postage paid and exactly as promised, as did the new Shuttle XPC power supply I’d bought online to see if I could resurrect toastball. In the meantime I’d transplanted its hard drive soul into Marc’s old computer, where it was a bit disoriented but managing well enough.

Replacing the power supply wasn’t enough this time, as it turned out, which meant I’d probably need a new motherboard, which meant I’d probably need a new computer, as SN41G2 motherboards were already hard to come by and you’d have to completely disassemble everything and it was so cramped in there that it hardly seemed worth it to go to all that trouble to resurrect what was really quite an obsolete computer. So I decided to shop for a new toastball.

In the meantime, I figured I’d try the new video converter with Marc’s computer, to make sure it worked. I admit to feeling a bit of trepidation when I connected the video cable, which turned out to be justified when the sparks and smoke came out and the screen went blank again.

Now I had two dead computers! (Sorry Marc!)

Well, of course I felt pretty silly! So I resolved to figure out exactly what the heck was going on here before connecting any more video cables to anything.

The whole situation was extremely puzzling! The thing about video cables is that, in principle, they carry only relatively tiny electrical signals back and forth. Certainly not enough to make fireworks! Not normally, anyway.

What about the FireWire cable? Well, according to Wikipedia, the fellow on the phone had a good point there: FireWire cables are actually set up to deliver quite a bit of power, in addition to information. In fact this video converter was being powered directly from the FireWire cable.

But when I plugged the FireWire cable between the video converter and my freshly-assembled computer (toastball), everthing seemed to be fine: the little power light lit up, and there were no sparks or smoke or explosions or anything. It was only when I had connected the video cable that something had gone wrong. Clearly, there was a lot of power flowing through that cable for some reason.

I’d been reading a lot about electronics recently, perhaps because I was going into the electronics business, and one of the things I’d been reading was Tim William’s excellent book, The Circuit Designer’s Companion, which I highly recommend. The very first thing that he talks about in this book is grounding — how important it is, and how easy it is to get wrong, even though it seems like such a simple, basic thing.

You can think of electricity as being a bit like water flowing through a pipe. Electricity is to water as voltage is to water pressure: just as differences in pressure between point A and point B will cause water to try to flow through a pipe between them, differences in voltage are what cause electricity to flow. If I pick up a piece of pipe that’s open on both ends and drop it in a bucket of water, the water won’t spontaneously start flowing through the pipe, because there’s no difference in pressure. This is true whether the bucket is sitting on the surface of the moon or whether it’s at the bottom of the ocean. The absolute pressure doesn’t matter; only the differences. It’s the same way with voltage. When people talk about “zero volts” (or “ground”), what they’re really talking about is the arbitrary reference voltage that they’re measuring every other voltage in the system against.

The point that Tim Williams makes in the very first chapter of his book is that, if you’re going to assume that ground is ground and has the same voltage everywhere in your circuit, you’d better take steps to make sure that stays true. He gives a few examples, one of which involves a workbench in an electronics lab he used to work in where the ground prong in the electrical outlet unexpectedly turned out to have a voltage that was something like 50 volts off from ground in the rest of the lab. As long as you were making all of your measurements relative to that particular ground, everything looked fine — and in fact it was fine. But if you were to plug something in to that lab bench and try to make a measurement with a scope that was plugged in elsewhere…. Well, 50 volts is starting to be a lot of volts, you know? If part of your body were the only thing standing between two things that were 50 volts apart — I mean, it wouldn’t kill you or anything, probably, but you would definitely notice.

I guess that anecdote must have stuck in my mind, because I started thinking: Gosh, you know, the robot is plugged into that outlet over on the far side of the room, and toastball is plugged into this outlet over on this side of the room. What if one of these outlets were like the one in the story? All of these cables have a bunch of different wires in them, and one of the wires is always ground — it’s the reference voltage that everything else pushes against. Usually everything that’s ground is connected together. So if ground were a bit different on each side of this room, you’d get current flowing through that video cable. Maybe even enough to make sparks. How much would you need for that? A few volts? More? I guess I have no idea.

Anyway, it seemed like an easy enough theory to test. I got a voltmeter, and I got the two things I’d plugged together, and I carefully stuck the little probes onto the little conductors on the connectors to try to measure how much voltage would be trying to leap across them if I were to connect them. (It wouldn’t be able to actually leap across; in order to measure the pressure difference between two points, you have to stop the water from flowing between them. Otherwise the pressure will end up being the same!)

Unfortunately the readings I was getting on the voltmeter were not very helpful. They were usally pretty stable, which was good — if you try to measure the voltage between two things that aren’t electrically connected at all, it tends to sort of drift around randomly within a certain range. And they weren’t quite zero. But they were awfully close. The voltage difference seemed to be hovering right around 0.3 volts. Could you get sparks and smoke from 0.3 volts? I was kinda pretty sure you couldn’t, actually. That’s just not a lot of volts. In fact, 0.3 volts is about exactly the minimum amount you need in order for your average piece of sensitive digital electronics to be able to start to notice that the voltage is different at all.

By now I’d been banging my head against this problem for a couple of days, and was starting to get desperate enough to wonder if maybe I should resort to trying to scrounge up another old computer or two just to be able to do more experiments in order to have some hope of making progress. And then late one night I had a thought.

I always set my voltmeter to measure DC volts, as a matter of habit. What would happen if I turned it to AC instead?

DC is electricity flowing steadily in one direction. AC is electricity flowing back and forth and back and forth, rhythmically, alternating directions — there might be lots of electricity flowing back and forth, but if you total up the net flow, you get zero, or something pretty close. Which turns out to be a lot more efficient, in a lot of cases, for reasons I won’t go into today, even though AC seems a bit more complicated to think about. That’s part of the reason why household current is AC, not DC — unlike the teeny digital circuits I’m used to dealing with, PG&E ships a pretty sizeable amount of power around the state, and the efficiency gains end up being totally worth it.

Here’s a better analogy. Instead of water, say the electricity is people who want to visit a museum. The museum lobby is like a wire, and the museum itself is, I dunno, a rechargeable battery or something. The multimeter is the guard who stands in the lobby with the little clicker to count how many people go past. (Actually that guard is measuring current, not voltage, but in this case they’re proportional. Current is how much electricity or how many people are actually flowing through the doors. There are basically two things that determine how many people come in: the voltage, which is how motivated the people are to go in or out [“OMG, is that the Mona Lisa?”], and the resistance, which is how hard it is to get in or out [“What do you mean, tickets are $400?”]. The factors that get lumped together under “resistance” can be broken down further into things like the cross-section of the wire [number of doors or turnstiles or ticket lines, or the cross-sectional area of the pipe in the water analogy] and what the wire is made of — some metals have higher ticket prices than others, or else they enforce their no-glass-bottles policy by X-raying purses, or they have elevators, or they make everybody wear blindfolds and go through a maze. Or something. I don’t know. What am I, a materials scientist now?)

Now let’s say you’re the museum guard with the little clicker, and your job is to make sure that there are no people left in the museum when it’s closing time. You’re going to want to add 1 to your count when somebody goes in, and subtract 1 when somebody leaves. At the end of the day, the count should be zero. You are measuring DC (net) current (people) averaged out over a certain time scale (one business day). The direction the people/electrons are going (in or out) matters a lot to you in that case.

Next let’s suppose you wanted to measure the people/current by sticking part of your body — your finger, say — into the stream of people, such that they have to go through you to get in or out, and measuring the pain you feel whenever somebody steps on your finger. It turns out that when measuring the flow of people in this way, your finger feels pretty much exactly the same amount of pain whether the people are entering the museum or leaving the museum. Your finger is measuring AC people. This might be a good method to use if you are a masochist who wants a very crude estimate of total ticket sales. Similarly, you could try to make a very rough measurement of the the AC voltage of your electrical outlet by sticking your fingers in there and seeing how much it hurts. Strictly speaking, to estimate voltage, you have to factor in the combined resistance of your finger and of the rest of the lobby in order to deduce how desperate the people must be to either visit or escape from the museum, but that’s probably just some fixed scaling factor that you could lump in to the whole “volts per OW!” conversion.

So the next day I went back to my sketchy setup with the connectors and the voltmeter and I turned the little knob from DC to AC and the number on the meter went from 0.3 to 110. Just like that.

Yikes!

Which brings me back to how I got started on this topic: This particular multimeter is designed in such a way that it can accurately measure voltages of at least 600 volts, and sometimes even 1000 volts, without smoke or sparks or whatever. What it isn’t designed to be able to do is to protect the human being presumed to be holding the meter from those kind of voltages. There are some fairly well-thought-out rules about these things, you know? It sounds a bit confusing at first, but it’s a perfectly sensible distinction to make. What I was doing right then with these fiddly little metal probes was safe for the meter, but it was not especially safe for me. Or for toastball, for that matter.

Sketchy!

But wait! It gets sketchier.

Remember that 3-light outlet tester I was talking about? You can find them at almost any hardware store. They’re cheap. There are three lights because there are three prongs on an electrical plug, and if you want to look at the voltage across every possible pair of prongs, there are three pairs. So each light tells you whether there’s a voltage difference between a particular pair of prongs. There are two yellow lights for voltage between hot (110 volts AC) and neutral (0 volts), and between hot (still 110 VAC) and ground (also 0 volts). There’s a red light for voltage between neutral and ground.

Now, you might wonder why an eletrical plug would have two different prongs that are both supposed to have exactly the same voltage, namely 0 volts. Why not just have one prong? And, of course, in older apartments with 2-prong outlets, that’s exactly what you find. The reasoning back then was that it doesn’t really matter which prong is hot (110 V) and which is neutral (0 V); all that matters is that the difference is always 110 V. (The direction in which the electricity is going doesn’t matter either, because this is 110 volts AC, so the direction changes back and forth constantly — 60 times per second, in this case.)

That’s fine reasoning if all you care about is your stuff getting the power it needs, but if you also care about safety, then you also might decide that you want to pay attention to the voltage difference between (say) the metal casing of my toaster or computer or what have you, and the voltage of the person who might be touching that case. If the difference is 0 volts, nothing happens and everyone is happy. But if the difference is large — 110 volts, say — then you will notice, and you will be unhappy. This can happen if, for example, a live wire comes loose inside your appliance and comes into contact with the metal case. It’s pretty rare, but it can happen.

The idea behind the third prong is that that prong is electrically connected directly to ground. There’s a big metal spike or pipe or something sticking deep into planet Earth at a single point underneath the house, and there are all of these wires radiating out from that point to all of the ground prongs in the outlets, keeping them at the same voltage as that patch of the actual literal ground. Which is why it’s called that. There is also an entirely separate network of wires radiating out from that single point to all of the neutral prongs on all of the outlets, and yet another wire connecting that point to the ground wire coming from PG&E.

When you plug in your toaster or computer or other 3-pronged appliance, the metal case of the computer is electrically connected to the 3rd prong, to make sure it has the same voltage you do, assuming that you are standing on the ground, to the extent that it’s possible to ensure that. If a live wire were to come loose inside the toaster, instead of silently electrifying the outside of your toaster, it will get into a fight with the ground wire over what the voltage should be. There will be a huge difference of opinion! Lots of electricity will flow! So much, in fact, that the circuit breaker will trip or the fuse will blow, and you’ll be safe.

Why not just have 2 prongs and connect the outside of the toaster to the neutral wire, instead of having all these redundant 0 volt wires? Well, first there’s the problem that the video converter tech support guy was talking about — polarized plugs are designed to fit only one way, but if you’re motivated enough, you can plug them in backwards. Now the outside of the toaster is connected to
110 V, not 0 V, and you’re in trouble.

The other problem is that, unlike the ground wire, the neutral wire is being used to carry significant amounts of eletricity. When it does that, the voltage rises above 0 — not all the way to 110, usually, but if you’ve ever noticed the lights dimming when the fridge comes on or when you turn on the vacuum, you’ve seen that the voltages of the hot and neutral wires are drifting noticeably closer together. You do not want the AC voltage of the outside of your fridge to rise every time the compressor kicks in! That’s why it needs separate prongs for ground and neutral. This is exactly the sort of problem that Tim Williams talks about in the first chapter of his book, by the way, though the context is a bit different. The point is that it’s always important to ground things correctly! And these things aren’t always immediately obvious. That’s why, when high voltages start to become involved, we have safety rules about these things.

Anyway, whoever did the wiring in this apartment either didn’t know about those rules or didn’t figure they were very important. All those 3-prong outlets? They don’t have separate ground and neutral wires. The wiring in the walls is the older kind, with just 2 conductors: hot and neutral. Each outlet has its own little wire tail that connects the ground prong directly to the neutral prong. Presumably the tail is there solely to fool the 3-light tester, which turns out to be exactly the tool the eletrical inspector from the city usually uses to make sure everything is hooked up correctly. It’s pretty hard to tell the difference unless you set up an elaborate experiment where you draw lots of power and measure the voltage more accurately, or open up the wall and look inside.

Which is fine, mostly. Usually wires don’t spontaneously come loose inside of electrical appliances, and usually appliances don’t draw enough power to bring the neutral wire far enough away from 0 volts to be really dangerous, and if they did, the fuse would still blow. The difference between 2 prongs and 3 is usually a subtle one, and one that people didn’t worry about at all until a few decades ago.

No, the real problem here was that, on one of the outlets in this back bedroom where I had the robot set up, the hot and neutral wires were reversed.

Normally, the 3-light tester would catch this right away. But if you’re tying neutral and ground together right at the outlet, so they both have the same voltage (110 V AC, in this case), the 3-light tester can’t tell anything is wrong. If you look at the instructions that come for the tester, you’ll find some vague disclaimer about how this this is possible, even though it’s usually pretty unlikely to happen by accident.

The other way you’d normally prevent this situation is by the color-coding of the wires inside the wall. The hot wire is black, the neutral wire is white, and the ground wire is usually just a bare metal wire, because it’s always at 0 volts and is just a wire stuck into the ground and it’s about as safe to touch as anything can be.

Back to the story. When I saw the number 110 on the multimeter, I set it down carefully, backed away slowly, thought about it for a long time, and went to fetch my 1-light tester. This is like the 3-light tester, but it just has two prongs and one light. The prongs are on flexible wires, so you can use them on either a 2-prong outlet (which was why I’d bought mine — to check to see if a 2-prong outlet was hooked up to power) or on different pairs holes in a 3-prong outlet. Unlike the multimeter probes, the prongs on the 1-light tester are designed to be relatively safe to stick into an electrical outlet; once you stick it in far enough to make eletrical contact, there’s little or no metal sticking out where you could touch it accidentally, just like with a regular eletrical plug.

I got an extension cord, and I connected my 1-light tester between the ground prong at the bottom of one outlet (the one toastball was plugged into) and the ground prong of the other one (that the robot was plugged into). And it lit up. Exciting!

After doing a bunch of similar experiments, and a few quite different ones, I was starting to get a pretty good picture of what was going on here, and what it might take to fix it. Probably I could just turn off the power, unscrew that outlet, swap the hot and neutral wires, close it back up, and everything would be fine, more or less. It might even be legal for me to do that, for all I know. But there are lots of rules, and I don’t know them, and by now I’m starting to get tired of this thing where I end up doing stupid dangerous things because somebody wasn’t paying attention to the rules. The rules are there for a reason.

So I called up our landlord, and I tried to explain. Our landlord’s name is Joe, and he’s a really nice guy. He works hard to keep the property in good shape. He didn’t really understand what I was going on about. But he agreed to bring in an electrician.

The electrician shows up and asks to see what I think is wrong. I wordlessly repeat my demo with the extension cord and the 1-light tester. The light comes on. “This,” I maintain, “is the problem. The entire metal case of whatever I plug in here gets electrified. If it weren’t for these fine non-conductive wood floors, I might already be dead.” I may have been exaggerating a little bit for dramatic effect. 110 volts won’t usually kill you directly. I bet it could start a pretty good fire, though.

Joe is looking on. He seems pretty nonplussed. The electrician too. I mean, come on! If this stuff were really as dangerous as I seem to be incoherently claiming, wouldn’t it be more obvious than that?

“Hold on,” says the electrician. And he goes back to his truck and grabs a 3-light tester and comes back upstairs and plugs it in to each outlet, and the 2 yellow lights come on, and the red light stays off. “See?” he says. “It’s fine.”

“Yes, actually, I have one of those too,” I begin.

And then we start to have a discussion. And then he stops me to tell me a story. I don’t remember the details anymore, but the story involves a situation in which this same fellow is working on something, in a dark, wet, cramped, unpleasant crawl space, with some exposed pipes, and he isn’t wearing boots, and the ground is wet, and his feet are wet, and at some point he happens to touch one of the pipes, and he gets a nasty shock.

And as he’s telling me this story, I start to realize that the punch line of the story is not, as one might hope, that he stopped what he’d been doing and figured out why the pipes were all eletrified and fixed the problem and made it safe. No! The moral of the story turns out to be that sometimes these things happen, and 110 volts usually won’t kill you, and that’s just the way the world is, and I should really just learn to suck it up.

“I can’t help you,” he concludes.

“Great!” I say. “You say you can’t help me, and I believe you 100%. Now get out of my house!” I think that, anyway. I must have used different words, at the time. Joe is looking a little bit embarassed. Later I wonder if I should have asked that dude to show me his license to practice electricity. I still wonder about that.

Once they’re gone and I’ve calmed down a bit, I go on the Berkeley Parents Network and troll around for recommendations for competent electricians, with a license from the state, and I come up with a list, and I make a few calls. Competent electricians, it turns out, are in demand. They tend to have busy schedules. But I do manage to get in touch with a couple of guys who call themselves Fighting Amish Electrical Services. I explain to them that I’m pretty sure I know what’s wrong, but I want to hire them to come in and check out the wiring at my house, and see what they think. I explain that I’ll be paying them for their time, and maybe Joe will reimburse me and maybe not — I’ve decided that it’s better to ask forgiveness than permission — but either way I want to do whatever I need to do to make sure the house is safe, dammit.

So they come in, and I congratulate them for having an awesome business name, and I show them my little demo, and I try to explain what I think is going on. And they look pretty skeptical, especially when the 3-light tester shows it’s OK, but I’ve agreed to pay them a considerable amount to check things out for an hour or two and they’ve agreed to do it. So they turn off the power and unscrew the outlets — sure enough, they’re not properly grounded, and that’s not right, but it’s nothing to get excited about, either especially in an old house — and they yank and scrape and test with the meter, and pretty soon they’re like, huh, you’re right. This one is backwards. These wires are the wrong color! Yikes!

Some time later, they ask if I know how to get into the attic. They say there’s probably a junction box up there, with the other ends of the wrong-colored wires, and it would be good to fix those before somebody else comes along and gets into trouble. I tell them that I have no idea how to get up there, but I’ll ask Joe. It later turns out that Joe doesn’t know either. I don’t think he wants to know. I think he’s afraid there might be asbestos or something. He told us, when we moved in, that there might be, somewhere, for all he knew, so we should probably assume there was, and not go stirring things up. Sounds like good advice to me.

So the Fighting Amish guys swap the wires and wrap the in appropriately-colored tape as best they can, in all the spots that they can reach without demolishing the house. Then they ask what I want to do about the 3-prong outlets that aren’t really. They explain that they can’t legally leave them like that. (Not the ones in the bedroom, anyway. They quite rightly refuse to speculate about the outlets elsewhere in the apartment, since they haven’t looked at those.) They can either replace them with 2-prong outlets, maybe, or they can disconnect the ground prong and put a little blue sticker on each one that says “NO EQUIPMENT GROUND.” (In theory, they could also come back and demolish the house and put in actual proper wiring in the walls. But not today.) 2-prong outlets are hard to come by these days, but they have lots of stickers. Sure, I say, put stickers. So they do that. By now they’ve been at it for least 2 hours, and they have other appointments and a non-trivial hourly rate, so I let them go.

Once they’re gone, I plug everything back in and, with some trepidation, I connect the video cable for the third time. Nothing explodes. All 4 cameras now work perfectly.

I gladly pay the electricians’ bill when it arrives. They even forward a copy to Joe, along with a more comprehensible and credible explanation than I was able to provide. He apologizes to me by phone that his electrician couldn’t fix the problem, and he reimburses me. Good for him! I offhandedly mention the idea of tearing the entire house apart to redo all the wiring with 3 conductors instead of 2, and we share a nervous little laugh, because the truth is that neither of us especially wants to turn the place into a war zone. I once witnessed a previous landlord make a much less ambitious improvement to some dodgy grounding. Not fun! I sure got some good use out of my UPS at that place, let me tell you.

Meanwhile, back at our Lake Merritt apartment, I got out my extension cord and my 1-light tester, and I checked every single outlet in the apartment to make sure none of the others were wired backwards. Turns out they’re all good. Though there are two in the living room that stay on even when I pull all of the fuses and turn off all of the breakers. (Why yes, this apartment has both.) The oddness with those outlets didn’t really have any practical impact on our lives until quite a bit later. But I’ll have to tell you that story another time. Right now I’ve got to run over to Fry’s to see if a new power supply will resurrect my dead computer….

The Making Of

If I had any sense at all, I would probably have used some kind of screen recording software to make yesterday’s video.  I doubt it would have taken more than an hour or two.  But where would be the fun in that?

Here’s what I did instead:

  • Had a Saturday morning conversation with Jessica about a fancy Internet valentine one of her friends had just received, and about the Internet in general.

  • Idea!

  • Outlined a script in Google Docs.  Turns out you can copy and paste formatted text from Web pages, including images, directly into your document.  At least, you can do it with the kind of markup that was popular in early 1997.  So my script turned into a mock-up.

  • Captured some raw footage.  On the Mac, you can press Cmd-Shift-4 to turn the cursor into a crosshair that you can drag to save a rectangular area of the screen into a PNG file on the desktop.  Who knew?  Bonus: the crosshair shows the cursor’s coordinates!  This came in handy later, I’m sorry to say.  I grabbed a chunk straight off of primordial Yahoo, seven or so pasted-and-edited groups of links right out of my script/mock-up, a big chunk of Firefox dolled up in a fanciful outfit, and a smaller chunk of Firefox with the Back button held down.  (If you hold it for a bit it shows a menu and stays pressed.  I chopped off the menu underneath.)

  • Still missing a very important piece of raw footage: the mouse cursor!  Cmd-Shift-4 won’t buy me that.  Grovelled through Google Images until I found something pretty close, then basically traced over it using the pencil tool in a drawing program.  The real OS X arrow cursor has fancy antialiased edges and a subtle drop shadow with blended transparency.  I didn’t need or even want subtle for this, so my low-tech version only has 3 kinds of pixels: 100% black interior, 100% white border, and 100% transparent background.

  • The original draft of the shooting script called for a ridiculously zoomed-in look at the web page, with big fat square pixels and no extraneous browser decorations in the frame, then a jump cut over to the Back button and back to the text.  Two problems: First, my 2010 web browser was drawing nice smooth blended antialiased text, which would have drawn undue attention to itself when zoomed in so the pixels were visible.  Probably there’s a way to turn that off.  But, also, the groups of 5 bullet points I’d ended up with were much wider than they were tall — too wide even for a 16:9 widescreen version of the movie.  Rather than go back and wrack my brain for more bullet points or edit down to get the good parts to fit, I settled on the 1:1 scale 320×240 version you see now, where the browser chrome takes up half the frame and the Back button is visible the whole time.  (I’d heard that YouTube scales uploaded videos to 320×240 anyway, so I figured I’d try for that.)

  • Futzed around with ancient Unix command-line image manipulation tools to crop the unevenly-sized margins out of my bulleted lists (pnmcrop), add uniform margins (pnmpad), and paste the new text into the content area of the web browser shot (pnmcomp).  Did the same with a cropped rectangle of the Yahoo page (pnmcut, pnmcomp).  Needed the height to match exactly for that one, which took me a few tries.

    [Side rant: Last time I tried to install pbmplus from source and typed pnmcut --help — which is of course the first thing you do when you want to use pnmcut, because who can remember all those crazy options? — instead of giving me a cheat sheat, it told me to run “man pnmcut.”  Fine, I said, and typed man pnmcut.  But then, instead of revealing how to use the program, it gave a link to the HTML documentation on the web site.  Which, okay, maybe that’s not so terrible.

    Now, the manual page with the link is auto-generated, and the HTML doc is maintained in sync with the program itself, so presumably it would have been possible (though perhaps not convenient) for the pbmplus people to rejigger it so that it auto-generates actual useful man pages from the HTML, instead of autogenerating crappy placeholders.  Maybe it could even have taken the good stuff from the top of the HTML and put it in the –help output.  But, you know, it’s a pain to do stuff like that, and I can totally understand why the pbmplus people might have felt that their time was better spent working on the actual software to do image manipulation and what have you.

    However, this placeholder man page took a novel approach that I haven’t seen elsewhere: after telling me ha ha, just kidding, no useful information here, please go to such-and-such URL instead, it had a new boilerplate paragraph with words to the effect of: Please note that, if your system administrator truly loved you, he or she could have installed this suite of programs in such a way as to make it so that right now, after typing man pnmcut, you would be reading the very documentation you are looking for, instead of this stupid autogenerated boilerplate with just a link in it.

    Now, if you yourself are the poor chump who originally installed this thing on the computer, and you read that message, you’re probably going to be all like, “Okay, I’ll bite — how do I install this thing such that I will get man pages that aren’t completely useless?”  And you go look it up… and, after much research, it turns out that, what the pbmplus people apparently expect you to do (or expected, at the time — no idea if this is still true) is to take your perfectly good “man” command and replace it with a different man command, written by the pbmplus people, that checks to see if you’re trying to view the man page for one of these pbmplus programs and, if so, pulls up the corresponding web page in, like, lynx or something.  Because that’s totally reasonable, right?  It just starts up a completely different program!  It has different keyboard navigation keys and everything!  But, you know, probably no one will notice.  That is, until they finish reading and press q to quit and it’s all like Are you sure you want to quit lynx? and they’re like “Yes!!!  WTF am I doing in lynx in the first place?  What is this, 1997?  This is terrible!  I never asked for this!”

    And oh, man, I can just imagine the conversations that must have ensued between innocent users typing man pnmcut and getting that passive-aggressive message and going straight to the IT manager or whoever and saying, “Dude!  Where’s my man page!  I just want to know how to run pnmcut, and this thing says that you could have done it right but you didn’t because you hate freedom!”  And then this poor system administrator has to sit there and somehow try to explain to this irate user that, no, actually, the cake is a lie.  And it’s sad to think about, because you just know that conversation is not going to end well for anyone.  Because, I mean, best case: the sysadmin is like, fine, no problem, let’s see… replace man, ok, sounds perfectly reasonable, I’ll get right on that… and the user ends up in Lynx, right?  And nothing works like it should!  And the user comes back and says, “Dude, you broke the man command!”  And the sysadmin says, “Only because you insisted I do it!”  And then they both go find the pbmplus people, and the pbmplus people are all like, “Geez guys, what do you expect?  It’s free software!

    And then, even after everyone has jumped through all those hoops, the pnmcut web page that you end up reading still says infuriating things like, oh, so sorry, pnmcut is deprecated now, we decided last Wednesday afternoon that we don’t like it anymore, so now we use pamcut, which is highly superior in every way but works differently.  You’ll love it, we promise.  Don’t worry, pnmcut is still there, but we’re certainly not going to tell you how to use it.  Now run along. So you dutifully click the link for “pamcut” and figure out how to rewrite all your stuff to use it and then finally go back and type pamcut -foo=bla frobozz.ppm and it’s all like pamcut: command not found.  Because you still have the version from Tuesday morning.  Oops!  Sucks to be you, I guess.

    Thankfully I don’t have to think about any of this anymore because somebody (either the pbmplus folks, or some other fork, or Ubuntu, or Debian, or someone else — my money’s on Debian, actually, but I’m too lazy to try to find out) stepped up and installed some sane man pages on Ubuntu, so if you type man pnmcut it very calmly explains how to use pnmcut with no passive aggression whatsoever.  And absolutely no lynx.  I’d managed to forget the whole thing until I clicked through that pnmcut link.  Wouldn’t that have been a shame?

    Here endeth the rant.  Back to making a YouTube!]

  • Turns out I forgot about a few small details!  If you click on a link in a web browser, even in early 1997, a number of things happen:

    1. As soon as you move the cursor over the link, it changes from an arrow into a little pointing hand.
    2. The link itself turns red during the click.
    3. A little dotted rectangle appears around the link as soon as you click it, to show that it has the keyboard focus.
    4. When you come back to it later, the link is purple.

    I decided to forego 1, 3 and 4 — again, not going for realism here! — but 2 is kind of an important cue, especially if you’re not going to bother trying to do foley.  Rather than go back to my script and make versions of the bulleted lists where some of the links were red instead of blue (which would have produced identical results and been much easier to do — Google Docs has a little “font color” doodad right there, for Pete’s sake), I ended up finding the coordinates of the rectangles corresponding to my links (which involved scribbling down numbers from the crosshair cursor onto a bunch of sticky notes and subtracting them with bc -l), cropping them out with pnmcut, swapping the red and blue channels using a 17-line Python program whipped up for the purpose, then splicing the channel-swapped rectangles back in with pnmcomp.  Now I had clicked and unclicked versions of each page.  Used a similar but less complicated trick to comp the depressed Back button into copies of the applicable frames.

  • Another missing ingredient: Title cards!  My script called for a black background with centered white text in some suitably florid font.  Fired up the ol’ drawing program again.  Zapfino was the closest font on the list to what I had in mind, so I ran with that.  I have no idea how to get this GUI to center text, and I’m far too lazy to try to center it by hand, so I ended up doing the pnmcrop/pnmpad trick again.  Except that if you do it that way, it centers the bounding box for the visible white pixels, not the baseline of the text!  I probably wouldn’t have noticed or cared, except that “Love” has no descenders and “Jacques” has this giant swoosh under the Q, which makes the whole line jump upwards by a very noticeable amount when pnmpad tries to center it vertically.  So I had to manually crank it back down by 16 pixels or something with an extra trip through pnmpad.  After that, everything looked sufficiently plausible to my eye, so I moved on.

  • Almost there!  By this time I have a big ol’ shell script that’s assembling all of these frames in order and putting them in numbered files and stitching them together into a video file, so I can view my work in progress.  Originally the video conversion happened in two steps: mencoder mf://*.png -o out.avi to make an AVI file, and then ffmpeg -i out.avi -o out.flv to convert to Flash Video, since YouTube’s going to do that if I don’t and I’d rather find out sooner what it’s going to eventually look like.  But then it turned out that some of the title cards at the end had only 16 shades of gray (you’d think only 2, black and white, but no: antialiased text strikes again!), so pnmtopng was using a 4-bit encoding for those frames when the rest of the frames used 8 bits per pixel (I guess — maybe this is why it so proudly announces how many colors it found?), which in theory you’d think wouldn’t matter at all but in practice mencoder was apparently failing to do the right thing with its crazy MPNG encoding, so the frames at the end were getting squished horizontally and were pretty much illegible.  I’m sort of surprised it didn’t just decide to douse my computer with gasoline and set it on fire at that point, actually.

    Anyway, it turns out that, unlike mencoder, ffmpeg can read PPM files directly, so long as you number them in strict sequence, starting from 1.  You just do ffmpeg -r 6 -i %d.ppm -o out.flv.  No pnmtopng, no mencoder, no stupid issues with the PNG encoding scheme changing mid-stream.  Terrific.  The -r 6 tells it to play 6 frames per second, for that extra lo-fi feel, just like the terrible Saturday morning cartoons of my youth.  (It also means I need to make fewer frames.)

  • You know, I still have to somehow splice a non-rectangular mouse cursor into all of these images and animate it moving around and all that.  Apparently you can use pnmtopng -alpha to extract a transparency mask from the PNG and get pnmcomp to use that when blending in your image, and then all you need is the X and Y coordinates of where you want your mouse cursor to go.  Wrapped that logic up in a shell function, cut and pasted a bunch of lines (one for each frame, basically), and started plugging in numbers for the mouse coordinates.  At first I was measuring things with the Cmd-Shift-4 crosshair cursor and the Post-it notes and the subtraction, but after a while I was like, well, gee, all I really want for this next shot is for the cursor to move up by two bullet points, and they seem to be about 16 or 19 pixels tall I think, so let’s just try this (type type type)… oops, didn’t quite get there, let’s try that again (type type type)… ok, that looks better.  But it’s going too fast!  Need to duplicate some frames, to make it pause a bit between steps, to slow down the pacing.  It’s funnier if you don’t rush, you know?  Probably could have stretched it out to run twice as long and ended up with something twice as funny.  Ah well, maybe next time.

  • Woo, done!  How’d that happen?  Wound up with 370 frames, which, at 6 frames per second, comes to 61 and 2/3rds seconds, so I cut a total of 10 frames from the various title cards to bring it down to 60 seconds exactly.

And there you have it!  Only took two days.  I even had enough time left over to have dinner with my favorite Valentine!

Jacques Visits the Internet

I made a YouTube!