Last month I ordered a copy of SVK, a comic book printed in three colors, only two of which are visible to the naked eye. Unfortunately, the included “SVK object” arrived with a dead battery. Fortunately, BERG London are awesome. I barely had time to finish reading the book before the replacement arrived and I had the distinctly different pleasure of reading it again.
The SVK object is about the size of a credit card. There’s a thick part near the power switch and light source, then it tapers off smoothly towards the edges. I was able to peel off the opaque labels on the front and back, revealing the transparent body of the device, apparently made from a single piece of plastic. Front and back views of the untouched replacement and the original with labels removed:
I screwed up when taking the above pictures — each side’s interior is shown next to the opposite side’s label. On the logo side, you can see one lead from each ultraviolet LED attached directly to the negative terminal of the battery with some transparent tape. The power button side has a rectangular indentation in the transparent plastic, with the LED leads taped to a momentary switch. Here’s another picture with the tape and the switch removed:
The pushbutton switch is just a cleverly-shaped little piece of stainless steel. It domes up in the middle and has four points: three at the corners of the triangle, to hold the switch in place, and a fourth in the center to make contact with the positive battery terminal when you press down on the dome. Underneath the switch is a round white sticker with a hole cut in it. The sticker prevents the corner prongs of the switch from making electrical contact with the battery.
I thought I might be able to ease the battery out on the logo side without removing any more parts:
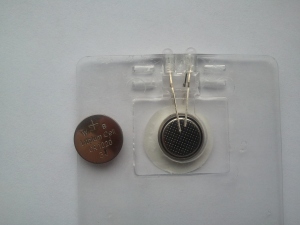
There are actually two batteries stacked in series. Ultraviolet LEDs probably need more forward voltage than a single 3 volt cell can muster. The battery on the switch side is stuck pretty firmly to the sticker. Looks like it will be necessary to disassemble this thing almost completely:
I removed the LEDs completely, even though I didn’t need to. If you ever find yourself in the above situation, note that the the shorter lead of each LED is the one that gets taped to the negative terminal of the battery, and the longer lead goes to the switch. Putting either the LEDs or the batteries in backwards will prevent the LEDs from lighting but shouldn’t cause permanent damage. Presumably, if both the LEDs and both batteries were backwards (with respect to the switch), everything ought to work fine….
The batteries are standard CR1220 3 volt lithium cells. My local drugstore apparently doesn’t carry that size, but Fry’s Electronics in Palo Alto sure does. (They’re also readily available online.)
If you’ve designed a circuit with a LED in it before, it probably included a resistor, to limit the current flowing through the LED. But these tiny coin cells simply aren’t able to deliver nearly enough current to fry the LEDs. The combined effective internal resistance of the coin cells is the only current-limiting resistor this circuit needs. Elegant.
The reassembled SVK object is no longer as pretty as its untouched replacement. I wasn’t very careful when removing or storing the labels, so they got curled and creased and didn’t quite want to stick back to the edges. But it works!


